HGym: Writing My Gym App

Hunter Fernandes
Software Engineer
- Choosing the Stack
- Nativeness
- Framework
- Data Locality
- Backend
- Accounts
- The Stack
- The Data Model
- User
- Person
- Exercise
- Day
- WorkoutDay
- WorkoutDayExercise
- EmbeddedSetInfo
- Collections and Ownership
- Arranging the Data with Sub-Collections
- Firebase Security Rules
- Getting Started with Flutter
- Data Flow & Architecture
- File Structure
- Gym Datastore
- Google Login
- Home Screen
- Forms
- Router
- App Drawer
- The Little Things
- Splash Screen
- Web Deployment
- CI
- Conclusion
- Footnotes
Last year, I decided to start going to the gym with a focus on powerlifting. Like everyone else, I wanted to track my progress and see how I was improving. I created a spreadsheet with my workout routine, printed it, and filled it in every time I went to the gym.
This paper-based system was fine for a while, but I wanted something more interactive. I checked out a few gym apps, but none had the features I wanted. More to the point (and in a classic case of not invented here syndrome) — I wanted to build something myself.
I was interested in dipping my toes into mobile development. I am a backend/infra engineer at heart, but I wanted to learn something new. So, I decided to make my gym app as a learning exercise.
This blog post details my journey in creating this app — from modeling my data to choosing my stack to writing code to adding CI.
Choosing the Stack
I spend only a few innovation tokens on new technologies in my day job to reduce risk. But, for personal projects, I can go wild. Here’s how I approached the decision-making process for this project.
Nativeness
The first decision was, “should I make a native app or a cross-platform app?” I decided to follow the siren call of cross-platform development.1 I am an Android user, but being able to compile to an iOS and Web app is compelling. So cross-platform it is.
Framework
Next, should I go with React Native or Flutter? I have some experience with React, but I wanted to learn something new. At that time, Flutter had just announced its 3.0 release, and it was getting a lot of buzz. Flutter looked nice, and I wanted to learn Dart. A decade ago, Google touted Dart as the next big thing. But it never took off as its “Javascript killer” billing promised it would.
That said, I have followed Dart’s development over the years and it looks really nice. Finally, I liked the Flutter documentation and the Flutter community. So Flutter and Dart it is.
Data Locality
Where should I store the data my app collects? Should I keep it on the device (local) or ship it off to a server (remote)? Frankly, this would be a great use case for keeping the data on device — do you really need to store your gym data on a remote server? (No.) I thought long and hard about this, but I decided to go with a remote store.
The most compelling reason for going with a remote data store was that it dovetails with my previous cross-platform choice. Flutter allows me to compile to Web, and I wanted to be able to access my data from any device. My idea is that “in the field” at the gym I would use my phone to enter data, but at home I would use my laptop to analyze it. This is two fundamentally different consumption patterns, and I wanted to support both. That means I need a remote store so data can be accessed from any device.
Backend
OK, I’ve decided to use a remote store, but what should I use? As a backend engineer, my gut reaction is to write a REST API in Python + FastAPI, deploy it to AWS API Gateway/Lambda,2 and back it with DynamoDB or PlanetScale. But this requires my front-end code to handle not having a network connection available, buffer the data, and then sync it when the network is available. It’s totally doable, but what a headache.
Personal-project Hunter is doing this “frontend first” and using Firebase, which I hear all the cool kids are using. I’ve never used Firebase before, but I’ve heard good things. It’s also free and — most importantly — claims to work offline. It will deal with the syncing for me!
Accounts
If I store my data remotely, I need to have some way to authenticate users. I manage an authentication system at work, so I know how much of a pain it is. I do not want to deal with that in my freetime. Therefore, Google Sign-In it is. Good enough for me!
Finally, Firebase is tightly integrated with Google Sign-In, so it’s a natural choice. I will have to figure out Apple’s sign-in at some point, but that’s a problem for future me.
The Stack
- Flutter for the front-end
- Dart as the language
- Firebase for the backend
- Google Sign-In for authentication
This is way too much new stuff and a recipe for disaster. But a fun disaster! And that’s what personal projects are all about, …right?
The Data Model
Firebase is a document store, so I need to think about how to model my data upfront. You can get in big trouble if you don’t do this early with NoSQL databases. Relational databases are very forgiving when figuring out your data model on the fly. But not NoSQL databases. (You pay for this in other ways with relational databases.)3
User
The User object is the primary object in the system. Basically, everything else is a child of the User object in some way.
- ID:
String(Firebase Auth ID) - Name:
String - Email:
String - Profile Picture:
String(URL)
Person
I go to the gym with friends and I want to be able to track their progress as well. This Person allows us to link future data entries with a Person instead of a User. This gives us a lot of flexibility in the future: you could share a Person with another User, etc.
- ID:
StringFirebaseID - Name:
String - Is Primary:
Boolean
We’ll create a default Person for each User, marked as Primary. We can do a few customizations for the Primary Person, like adding them when a workout starts.
Exercise
Exercise represents a single exercise that can be done. For instance, you might have a Bench Press exercise, a Squat exercise, etc. The user can select this to do during a workout.
- ID:
StringFirebaseID - Name:
String - Description:
String- Rep instructions, etc.
Day
A Day is a “prototypical” scheduled day at the gym. It consists of a name (useful in splits) and a list of exercises to do. For instance, on Leg Day I might do Squats, Deadlifts, and Leg Press, etc.
- ID:
StringFirebaseID - Name:
String - Ordered Exercises:
List<Id<Exercise>>
Ordering the exercises is important because it’s the order the user will do them in. Firebase supports arrays, so we can use that to store a list of exercise IDs.
WorkoutDay
A WorkoutDay is a specific instance of a Day. It’s created when a User starts a workout.
- ID:
StringFirebaseID - Ordered Exercises:
List<Id<Exercise>> - Ordered Persons:
List<Id<Person>> - Started:
DateTime - Template Day:
Id<Day> - Template Day Name:
String
Here I clone the Day object, add some metadata, and turn it into a WorkoutDay. When dealing with document stores, you want to denormalize your data as much as possible.
Here, I’ve decided to store the Template Day Name even though I could look it up from the Template Day ID. This avoids a query. This is very important because Firebase charges per query, and because knowing the day name will block rendering. The user will notice lag if we are stuck waiting for a dependent query to finish. I would already give this a lot of weight in my decisions, but in this instance, I am the user so I really care. I will notice it. Every. Time.
Since WorkoutDay is the primary object the user interacts with for a workout session, I want to make it as fast as possible.
WorkoutDayExercise
A WorkoutDayExercise is a specific instance of an Exercise. Like WorkoutDay, it’s a cloned Exercise object with some metadata. However, unlike the generic Exercise object, it has a weight and associated reps.
This thing actually stores the data!
I did not want one of these for every (Workoutday, Exercise, Person) tuple because that would be a lot of data. Instead, I wanted (Workoutday, Exercise) to be the primary key. We can leverage Firebase’s non-primitive data types to store a map attribute for rep information.
- ID:
StringFirebaseID - Workout Day ID:
Id<WorkoutDay> - Exercise:
Id<Exercise> - Name:
String - Description:
String(reps, etc) - Time:
DateTime - Set Information
Map<Id<Person>, EmbeddedSetInfo>
EmbeddedSetInfo
We embed a sub-object for each person on the WorkoutDayExercise.
- Notes:
String - Weight:
Double - WeightString:
String
We are leveraging Firebase’s ability to store maps to store the set information. We’d have a hard time doing this in a relational database.
Collections and Ownership
Here is our data model as it stands. Notice how relational it is. There are lots of pointers between objects!
Earlier, I said that the user object owned everything. But you may have noticed that there is no “owner” field in any object pointing back to a User.
This will stand out to you if you are used to relational databases. In a relational database, you might have the WorkoutDay table and a foreign key that points back to the User table. So all the WorkoutDay rows for all users exist in the same table, and you can only differentiate the rows based on a User ID Column.
In Firebase, there is a better way.
Firebase supports sub-collections. We can dynamically create a sub-collection for each type of user data. One for WorkoutDay, one for Exercise, etc. When it comes time to query a user’s data, we can query the sub-collection instead of a large mixed-user table. This significantly limits the amount of data we have to scan and reduces index management headaches.
Arranging the Data with Sub-Collections
Let’s flatten out our logical data model into a storage data model suitable for Firebase.
The Firebase data model is a tree, the top level being a list of collections. Then, each node is a document with attributes, and each document can have sub-collections. Recursive subcollections! What a world we live in!
But subcollections come with a caveat: you can’t query across subcollections. Anything we want to query together should be in the same subcollection. This is a practical limitation. To be honest, I think that if you run into this issue, you may want to reconsider your data model. Querying an unbound number of partitions of anything (relational or document) is a bad idea.
From the data model above, you might expect Day to have a sub-collection of WorkoutDay, but that’s not the case. We will want to query across all WorkoutDay objects for a User, so they should be in the same collection. This is also true for all the other objects owned by a User.
Therefore, we’ll have a top-level User collection. Each User will get a User document, and then each User document will have sub-collections for each type of object they own.
users/
    <user-id>/
        persons/
            <person-id>/
                ...
        exercises/
            <exercise-id>/
                ...
        days/
            <day-id>/
                ...
        workout-days/
            <workout-day-id>/
                ...
        workout-day-exercises/
            <workout-day-exercise-id>/
                ...
Now I don’t need to maintain indexes or worry about querying across partitions. The cardinality of any result set is limited by the number of objects a user can have of that type.
In a relational database, a bad query can cause a full table scan, and you pay a price for all data of that type stored across all users. Subcollections are an end-run around this problem and are a great feature of Firebase.
This also isolates performance problems to just the user who is creating them. Since all data is grouped together in a relational database, a performance problem with one user can affect all users. However, with subcollections, a “normal” user has a “normal” amount of data in their isolated subcollection, and wouldn’t experience performance issues.
Firebase Security Rules
This meshes really well with Firebase’s security rules. Instead of having complex (and expensive) row-based security rules, we can have simple collection-based security rules.
Look at that data model tree. By only specifying the top-level User node, we can assign a rule that users can only access their owned subcollections. Sub-collections have let us end-run around the need for complex security rules like attribute-based access control.
rules_version = '2';
service cloud.firestore {
  match /databases/{database}/documents {
    match /users/{userId}/{documents=**} {
      allow read, write: if (
        request.auth != null && request.auth.uid == userId
      )
    }
  }
}
Once a user is authenticated, Firebase assigns them a user ID (uid) and an access token. We can access that uid in the security rules (request.auth.uid) and compare it to the user ID in the document path ({userId}).
Spending time thinking about the data model has already given us a lot of benefits: easier querying, better performance, and simple security rules.
Getting Started with Flutter
These days I use Linux (Pop!_OS gang represent!) as a daily driver. Fortunately, Linux is a first-class citizen in most development ecosystems, including Flutter! Installing Flutter was as simple as downloading a tarball, extracting it, and running some apt installs. I went with Android Studio + the Flutter plugin for my IDE.
Let’s create the project:
$ flutter create hgym
Creating project hgym...
Resolving dependencies in hgym...
Got dependencies in hgym.
Wrote 129 files.

All done!
You can find general documentation for Flutter at: https://docs.flutter.dev/
Detailed API documentation is available at: https://api.flutter.dev/
If you prefer video documentation, consider: https://www.youtube.com/c/flutterdev

To run your application, type:

  $ cd hgym
  $ flutter run

Your application code is in hgym/lib/main.dart.
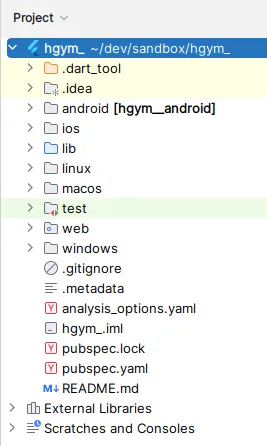
The initial project structure of a Flutter project.
That creates a new Flutter project with the default structure. This includes a lib directory with a main.dart file as well as an android, ios, web, windows, macos, and linux directories.
We won’t be using Windows, MacOS, or Linux for this project. I am just targeting Android with a possible future Web target.
Let’s make sure we can build this thing. I created an Android 14.0 device in the Android Virtual Device Manager and ran the app.
Once the device is up, I can see it as the device target and launch the app by clicking the Debug button.
![]()
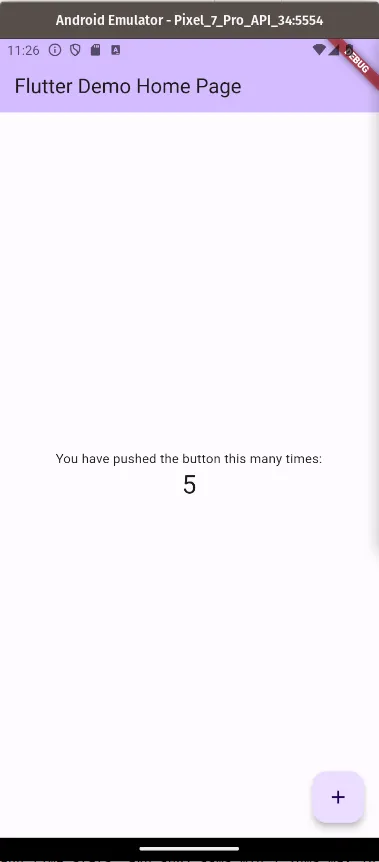
And there it is — the default Flutter app running on my Android emulator!
Data Flow & Architecture
I decided to go with the fairly common model-view-presenter (MVP) architecture. I prefer this to the model-view-controller (MVC) architecture because it separates the concerns of the view and the presenter.
How data flows through the app.
We need to augment MVP a little bit because our app is not going to have a smart backend. Our app needs to manipulate the data structure a lot, so we’ll need a strong model layer. Generally, the app would make a request to the backend, and the backend would perform complex operations and return the result. Since we’re using Firebase, we’re going to have to do a lot of the heavy lifting in the app itself.
In Flutter, the view and the presenter are smushed together into a single object called a StatefulWidget. This creates UI widgets and handles callbacks from user interactions. Our StatefulWidgets take a data object (e.g. a WorkoutDay) and render it as a UI. Then, if the user interacts with the UI, say, by clicking a delete button, the StatefulWidget will call a method on our data model controller (say deleteWorkoutDay).
Our data model controller is the brains of the operation. It exposes methods to retrieve and manipulate the high-level data objects. The controller exposes the interface that a human would use to interact with the data. For example, createWorkoutDay(), deleteWorkoutDay(), logWorkout(), etc. Under the hood, the controller knows how all the different data objects are related and how to manipulate them. It will CRUD the data objects as needed and call the Firebase SDK to persist the changes.
This design is nice for testing: we can test the controller in isolation from the UI. Then we can provide a mock controller to the UI for its tests. This way we can test the full stack.
The last piece of the puzzle is the Firebase SDK. This is mostly out of our control, but we will need to interact with it to read and write data. The Firebase SDK will handle the network requests and data syncing. It will also handle the offline caching.
File Structure
While I plan on only targeting Android and Web for now, I might want to add more devices in the future. For this reason, we will have a strong library component to our app. Controllers can be shared between the different platforms, and the UI can be platform-specific. This will maximize code reuse.
- lib/ - All Dart code
- components/ - Reusable UI components
- controllers/ - Data model controllers
- ds/ - Data structures
- screens/ - Platform-specific UI
- main.dart - Entry point
When it comes time to implement features, we’ll put a little code in each of these directories.
Gym Datastore
Let’s start creating our main data store first. We’ll create a class in a new file, lib/ds/datastore.dart. This is a singleton class that will be the entry point for all data operations.
class GymDatastore {
  static final GymDatastore _inst = GymDatastore._internal();

  factory GymDatastore() {
    return _inst;
  }

  GymDatastore._internal();

  static var db = FirebaseFirestore.instance;
}
We’ll reference this class in our controllers to perform data operations. It will grow as we add more data operations.
Google Login
The first thing I wanted to do was to get Google Sign-In working. I can’t do anything without a user, so this is the logical first step. Google has an existing dart package for this. Let’s also add the Firebase package while we’re at it.
flutter pub add google_sign_in
flutter pub add firebase_core
flutter pub add firebase_auth
Then I ran flutter pub get to get the new packages.
We initiate the Firebase SDK in the main.dart file.
void main() async {
  WidgetsFlutterBinding.ensureInitialized();
  await Firebase.initializeApp(
    options: DefaultFirebaseOptions.currentPlatform,
  );
  runApp(const HunterGymApp());
}
Now let’s create lib/screens/login.dart to handle the login screen. We will have one button that just says “Login with Google”.
Android is nice because Google Accounts are tightly integrated with the OS. There is a standard UI for Google Sign-In that we can use to just catch the result.
Firebase and Google are also tightly integrated. We can take the Google Sign-in result and pass it to Firebase to get a Firebase User object. And voila, we have a user!
  static Future<firebaseauth.User?> signInWithGoogle() async {
    var auth = firebaseauth.FirebaseAuth.instance;

    final GoogleSignInAccount googleUser = (await GoogleSignIn().signIn())!;
    final GoogleSignInAuthentication googleAuth = await googleUser.authentication;
    final googleAuthCredential = firebaseauth.GoogleAuthProvider.credential(
        accessToken: googleAuth.accessToken,
        idToken: googleAuth.idToken,
    );
    final firebaseauth.UserCredential userCredential = await auth.signInWithCredential(
        googleAuthCredential
    );

    return userCredential.user;
  }
We need to write a PDO for our User object. Since Firebase stores JSON documents, we must convert our User object to a Map and back. Annoyingly, Dart does not have a built-in way to convert a class to a Map.
import 'package:cloud_firestore/cloud_firestore.dart';

class User {
  String? id;
  String displayName;
  String email;
  String photoURL;

  User({
      this.id,
      required this.displayName,
      required this.email,
      required this.photoURL});

  Map<String, dynamic> toMap() {
    return {
      "displayName": displayName,
      "email": email,
      "photoURL": photoURL,
    };
  }

  User.fromDocumentSnapshot(DocumentSnapshot<Map<String, dynamic>> doc)
      : id = doc.id,
        displayName = doc.data()!["displayName"],
        email = doc.data()!["email"],
        photoURL = doc.data()!["photoURL"],
        nickName = doc.data()!["nickName"] ?? "";
}
I had to do this for all the objects in the data model. I’ll spare you the details — none of them are particularly interesting. Dart is very verbose here: I am getting flashbacks to Java. Adding a single new field requires writing the same boilerplate 5 times.
We also modify our GymDatastore to have a createUser operation:
class GymDatastore {
  ...
  static final _users = db.collection("users");

  Future<User> createUser(String id, User user) async {
    await _users.doc(id).set(user.toMap());
    return user;
  }
}
This leverages Firebase’s .collection to get a collection reference. It greatly simplifies our code. In our function body we could use the pre-resolved collection. This function returns a Future<User> because it is an async operation. In the future, the function might enrich the user object — hence the return value.
Finally, we create a screen to handle the login.
lib/screens/login.dart:
class LoginPage extends StatefulWidget {
  const LoginPage({super.key});

  @override
  State<LoginPage> createState() => _LoginPageState();
}

class _LoginPageState extends State<LoginPage> {
  void _doLogin({required Function(String) onError}) async {
    firebaseauth.User? idpUser;
    PlatformException? exc;

    try {
      idpUser = await signInWithGoogle();
    } on PlatformException catch (e) {
      exc = e;
      log("Error on sign in: code=${e.code} message=${e.message}  details=${e.details}");
    }

    var idpUserId = idpUser?.uid;

    if (idpUserId == null || exc != null) {
      onError(
          "Error Signing In: ${exc?.code}: ${exc?.message}: ${exc?.details}");
      return;
    }

    var ds = GymDatastore();

    var newUserProps = User(
      displayName: idpUser!.displayName!,
      email: idpUser.email!,
      photoURL: idpUser.photoURL!,
    );

    var user = await ds.getUserById(idpUserId);
    if (user == null) {
      user = await ds.createUser(idpUserId, newUserProps);
    }

    log("Got gym user: $user");
    Future.delayed(Duration.zero, () {
      Navigator.pushNamedAndRemoveUntil(context, '/', (r) => false);
    });
  }

  @override
  Widget build(BuildContext context) {
    return Scaffold(
      body: SafeArea(
        child: Padding(
          padding: const EdgeInsets.only(
            left: 16.0,
            right: 16.0,
            bottom: 20.0,
          ),
          child: Column(
            mainAxisAlignment: MainAxisAlignment.center,
            mainAxisSize: MainAxisSize.max,
            children: [
              const Row(),
              Expanded(
                child: Column(
                  mainAxisAlignment: MainAxisAlignment.center,
                  children: [
                    const Image(
                      image: AssetImage('assets/images/ic_launcher.png'),
                      height: 150,
                      width: 150,
                    ),
                    Text(
                      'Hunter\'s Gym',
                      style: TextStyle(
                        color: Theme.of(context).primaryColor,
                        fontSize: 40,
                      ),
                    ),
                    Text(
                      'Login',
                      style: TextStyle(
                        color: Theme.of(context).primaryColor,
                        fontSize: 30,
                      ),
                    ),
                    const SizedBox(height: 20),
                    GestureDetector(
                      onTap: () => _doLogin(
                        onError: (String errorMessage) {
                          log("Login error: $errorMessage");
                          if (mounted) {
                            ScaffoldMessenger.of(context).showSnackBar(
                                SnackBar(content: Text(errorMessage)));
                          }
                        },
                      ),
                      child: const Image(
                        image: AssetImage(
                            'assets/images/btn_google_signin_light_normal_web@2x.png'),
                        height: 50,
                      ),
                    ),
                  ],
                ),
              ),
            ],
          ),
        ),
      ),
    );
  }
}
We need a good logo. What’s better than an emoji of me doing my favorite exercise? That’s the overhead press!
| Login Screen | Google Sign-In |
|---|---|
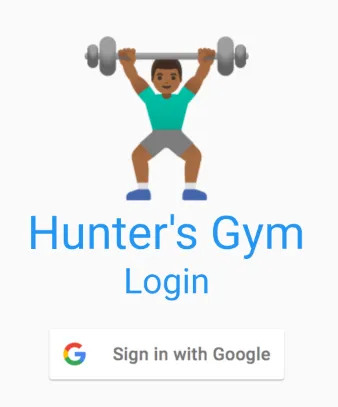 | 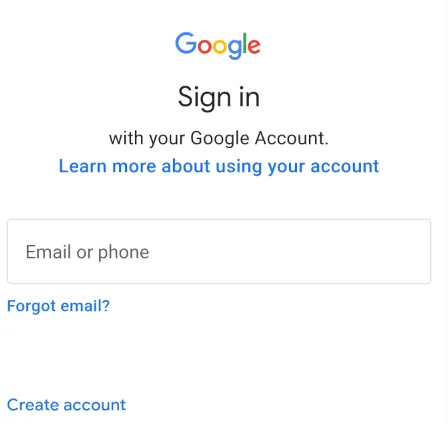 |
| You are first shown a login screen | Clicking the Google Sign-In button will take you to the Google Sign-In screen |
Our login screen now works. It creates the user in Firebase. But then the app crashes. This is because when login is complete, I send the user back to the home screen. But there is no home screen yet! Oops.
Home Screen
The home screen is the first thing the user sees day-to-day. I want it to have the most common actions the user will take. That should be two things:
- Start a new workout.
- View past workouts.
We need a new screen for this — lib/screens/home.dart will contain a HomePage extending StatefulWidget. This would be a big chunk of code to have in one class, so we’ll break it up into smaller classes and stack them in the parent Column.
Our parent can then just look like some code wrapping our core:
ListView(
    children: [
        Padding(
            padding: const EdgeInsets.all(10),
            child: Center(
                child: Text(
                    "Welcome to Hunter's Gym!",
                    style: Theme.of(context).textTheme.titleLarge,
                ),
            ),
        ),
        const StartWorkoutWidget(),  // <==
        const RecentWorkoutDaysWidget(),  // <==
    ],
),
StartWorkoutWidget and RecentWorkoutDaysWidget are interesting because they need to be hydrated with data. Most of our widgets will fall into one of two categories: those taking data as parameters and those that take a controller as a parameter and fetch the data themselves.
Those taking controllers should be more rare, and just the top-level widgets. You have to test these more.
Let’s implement the RecentWorkoutDaysWidget (the other one is similar).
class _RecentWorkoutDaysWidgetState extends State<RecentWorkoutDaysWidget> {
  Future<QuerySnapshot<WorkoutDay>> _getData() async {
    var store = GymDatastore();
    var userId = GymAuth.userId();
    return store
        .workoutDays(userId)
        .orderBy('started', descending: true)
        .limit(5)
        .get();
  }

  @override
  Widget build(BuildContext context) {
    var theme = Theme.of(context);

    return Card(
      clipBehavior: Clip.antiAlias,
      child: Column(
        children: [
          ExpansionTile(
            title: const Text('Recent Workouts'),
            children: <Widget>[
              FutureBuilder(
                future: _getData(),
                builder: (BuildContext context,
                    AsyncSnapshot<QuerySnapshot<WorkoutDay>> snapshot) {
                  if (!snapshot.hasData) {
                    return const Column();
                  }

                  var docs = snapshot.data!.docs;

                  return Column(
                    children: [
                      for (var day in docs)
                        ListTile(
                          title: Row(
                            children: [
                              Text(day.data().templateDayName),
                              const Text(" "),
                              Text(
                                "(${getDateString(day.data())})",
                                style: theme.textTheme.bodySmall,
                              ),
                            ],
                          ),
                          trailing: const Icon(Icons.chevron_right),
                          onTap: () {
                            Navigator.pushNamed(
                              context,
                              "/workoutday/edit",
                              arguments: WorkoutDayPageArguments(day.id),
                            ).then((value) => setState(() {}));
                          },
                        ),
                    ],
                  );
                },
              ),
            ],
          ),
        ],
      ),
    );
  }

  String getDateString(WorkoutDay workoutDay) {
    var dt = workoutDay.started.toDate();
    return DateFormat.yMEd().format(dt);
  }
}
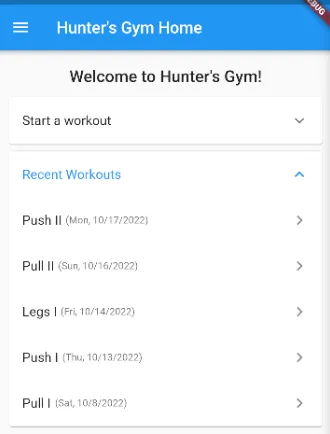
The home screen now shows the recent workouts.
We use the ExpansionTile widget to create a collapsible list. We have to make a network call to get the data, so we use a FutureBuilder to handle the loading state. This allows us to show a loading spinner while the data is being fetched. It keeps the UI responsive instead of blocking the UI thread.
You can see at this point that one of the downsides of Flutter is that you have to write a lot of boilerplate. There are a lot of nested widgets and a lot of callbacks. Especially jarring is the multiple closing braces in a row.
I seeded the database with some data, and the home screen now shows recent workouts. This is a good way to see what the last few workouts were to get an idea of what you’ve been doing.
StartWorkoutWidget was similar, but it had a button to start a new workout.
If I were to do this again, I would refactor return store.workoutDays(userId).orderBy('started', descending: true).limit(5).get() out from the Widget and into the GymDatastore. The Widget should not be responsible for ordering or limiting the data.
Next, I would change the Future that goes into the FutureBuilder. The Future should be constructed once in the initState method instead of being constructed every time the widget builds. This was a really rookie mistake — you can tell I’m new to Flutter. But I got saved by two things:
- Flutter is pretty good about
build()ing the widget (especially since I (incorrectly?) marked the widget asconst). Thebuild()method is just not being called a lot. - Firebase SDK is caching the result. Firebase knows that the underlying collection has not changed (due to Subscriptions, which I am not going to cover), so the just returns the prior result.
Nevertheless, I would fail this in a code review.
Forms
This app is for entering data, so there will be a lot of forms. Let’s create a form for creating a new workout day.
Forms in Flutter are a bit of a pain. You need a form key (an object to identify a form object between build cycles), a TextEditingController, and an input field. You initialize the form controller and keep it in your widget state, then you pass it to the input field. We need to remember to dispose of the controller when the widget is disposed. This is a lot of boilerplate for a simple form.
class _DayAddPageState extends State<DayAddPage> {
  final _formKey = GlobalKey<FormState>();
  final nameController = TextEditingController();

  @override
  void dispose() {
    nameController.dispose();
    super.dispose();
  }

  @override
  Widget build(BuildContext context) {
    return Scaffold(
      appBar: AppBar(
        title: const Text("Add Day"),
      ),
      drawer: const GymDrawerWidget(
        activeRoute: "/days/add",
      ),
      body: Form(
        key: _formKey,
        child: Column(
          children: [
            TextFormField(
              controller: nameController,
              decoration: const InputDecoration(
                  labelText: "Day Name",
              ),
              validator: (value) {
                if (value == null || value.isEmpty) {
                  return "Enter value";
                }
                return null;
              },
            ),
            ElevatedButton(
              onPressed: onSubmit,
              child: const Text('Create Day'),
            ),
          ],
        ),
      ),
    );
  }

  ...
}
Then, when our “Create Day” button is pushed, onSubmit is called. We then validate the form and retrieve the value from the field nameController.value.text.
  void onSubmit() {
    if (_formKey.currentState!.validate()) {
      var name = nameController.value.text;
      var store = GymDatastore();
      store.createDay(name).then((value) {
        Navigator.pop(context);
        ScaffoldMessenger.of(context).showSnackBar(
          SnackBar(content: Text('Created Day: $dayName')),
        );
      });
    }
  }
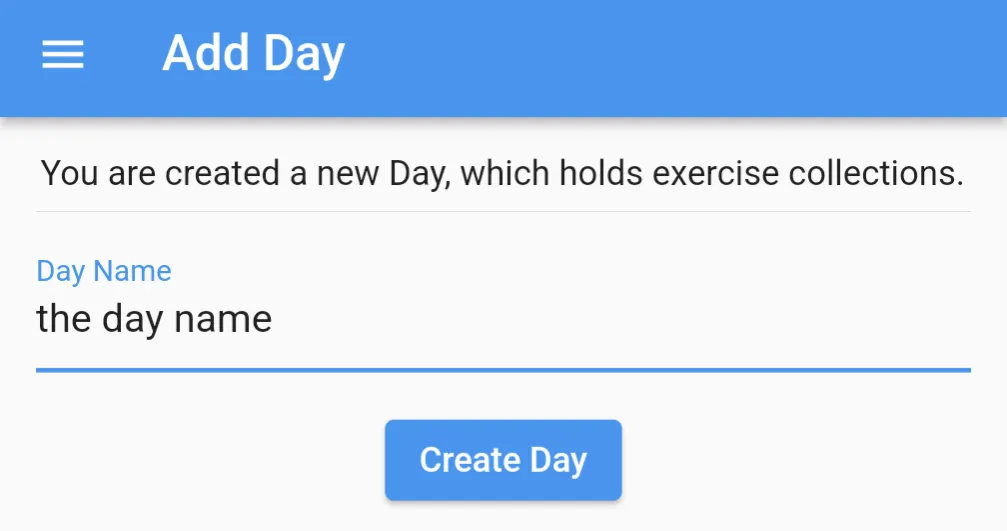
The form for adding a new day.
I pop the context to go back to the previous screen at the end of most form submissions. I also show a nice SnackBar to notify the user that the form was submitted. I should probably also show an error message if the form submission fails.
Router
Screens are just Widgets in Flutter. Big Widgets, but still Widgets. We treat them specially, though. We want to navigate between them. To do this, we need to map a route to a screen.
MaterialApp has a routes parameter that takes a map of routes to Widgets. We have to instantiate the widgets in the map, so we use a lambda. Using a lambda allows us to avoid massive lag when the app starts up.
Even with the routing logic, our primary app widget is still very thin.
class HunterGymApp extends StatelessWidget {
  const HunterGymApp({super.key});

  @override
  Widget build(BuildContext context) {
    return MaterialApp(
      title: "Hunter's Gym",
      theme: ThemeData(
        primarySwatch: Colors.blue,
      ),
      initialRoute: '/',
      routes: {
        '/': (context) => const MyHomePage(),
        '/days': (context) => DaysPage(),
        '/days/add': (context) => const DayAddPage(),
        '/days/details': (context) => const DayDetailPage(),
        '/exercises': (context) => const ExercisesPage(),
        '/exercises/add': (context) => const ExerciseAddPage(),
        '/login': (context) => const LoginPage(),
        '/profile': (context) => const ProfilePage(),
        '/workoutday/edit': (context) => const WorkoutDayPage(),
      },
    );
  }
}
This allows me to use Navigator.pushNamed to navigate between screens. It’s way easier than passing a constructed new screen to the Navigator. You could do that, but why would you?
Routes can also take arguments. For example, our WorkoutDayPage takes a WorkoutDayPageArguments object. We consume this in the state object of the WorkoutDayPage widget.
class WorkoutDayPageArguments {
  final String workoutDayId;

  WorkoutDayPageArguments(this.workoutDayId);
}

class _WorkoutDayPageState extends State<WorkoutDayPage> {
  Future<WorkoutDayController>? controllerFuture;

  @override
  Widget build(BuildContext context) {
    final args =
        ModalRoute.of(context)!.settings.arguments as WorkoutDayPageArguments;
    ...
  }
  ...
}
Note that we must consume it in build() (even though it’s ugly) because we need to access the BuildContext parameter. This requirement is perhaps another thing that logically separates Screens from normal Widgets. If this were a normal Widget, divining arguments from the BuildContext would be a code smell.
For our Screen, we would access the args, do something with it, and pass it to the constructor of yet another widget. That way we keep the context voodoo isolated to just the screen class. The underling widgets don’t need to know about it and stay clean (and, perhaps if we’re lucky, const?).
App Drawer
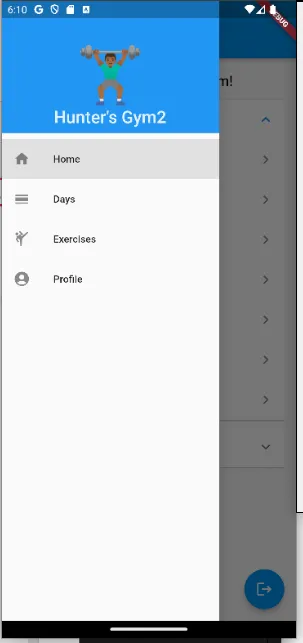
The app drawer is a great place to put navigation links.
Every app needs a drawer! They are great for navigation and showing the user where they are in the app.
Flutter makes it really easy to create a drawer. You simply pass a Drawer widget to the drawer parameter of the Scaffold. We make a custom Widget for this which build()s a Drawer widget.
Since it’s just a normal widget, you can make it look however you want. I wanted a nice big logo at the top and a list of links to the different screens.
This change did not require a lot of code, but it made the app much more usable. Wow, so professional!
The Little Things
I think the little things separate a good app from a great one. Small usability improvements that make the app feel more polished.
You learn these things by using the app a lot and exercising the use cases. A nice thing about making my own app is that when I find a pain point I can just go home and fix it.
There are tons of little quality-of-life improvements that I learned from the field:
- On the start workout page, put a little pip next to the day I think will be next.
- Show the weights from the previous few days on the exercise entry screen.
- Show personal records on the exercise entry screen. This is a great motivator.
- Some exercises measure time instead of reps. For example, planks or a spin bike.
- Show the last time the user did this exercise.
These little things are enabled by the data that I collect. In a way, these little things are the advantages over paper and pencil. None of these things are impossible on paper. But in the app these reduce the friction to zero. These are what make the app win in a head-to-head comparison.
Splash Screen
The app does not take that long to launch. But for a split second, you see a loading screen. Obviously this won’t do for my little app. Plus, it’s another great place to put my logo.
An interesting thing about the splash screen is that it’s unique to the platform. That means we need to get into the weeds of the Android project to add it.
In Android, this is done by creating a android/app/src/main/res/drawable-v21/launch_background.xml file.
<?xml version="1.0" encoding="utf-8"?>
<layer-list xmlns:android="http://schemas.android.com/apk/res/android">
    <item android:drawable="@color/shirtColor" />
    <item>
        <bitmap
            android:gravity="center"
            android:src="@mipmap/ic_launcher" />
    </item>
</layer-list>
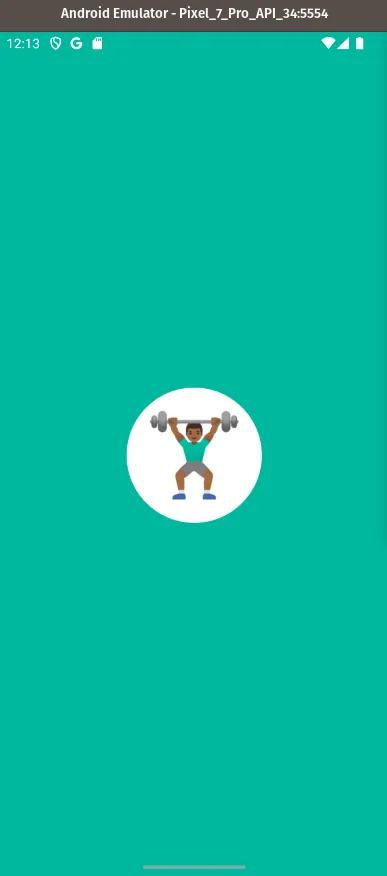
The splash screen is the first thing the user sees.
Of course, @color/shirtColor is not a real color. I defined this in android/app/src/main/res/values/styles.xml by adding the line:
<color name="shirtColor">#00b89f</color>
You are supposed to put all Android styling information in the styles.xml file. But this doesn’t work with Flutter, which has its own styling system. The reason we have to do this is because the splash screen is not a Flutter widget. It’s an Android thing.
Web Deployment
Building for the web is allegedly as simple as running flutter build web. This gets you a build/web/ directory with all the files you need — similar to a dist/ directory.
But we need to host this somewhere. We are already using Firebase, so we can use Firebase Hosting. It’s just a basic static file host, but that’s all we need for a Flutter web app.
First, we need to enable Firebase Hosting with firebase experiments:enable webframeworks, then firebase init hosting. We need to edit our firebase.json file to tell Firebase to serve web files.
{
  "hosting": {
    "public": "build/web",
    "ignore": [
      "firebase.json",
      "**/.*",
      "**/node_modules/**"
    ],
    "rewrites": [
      {
        "source": "**",
        "destination": "/index.html"
      }
    ]
  }
}
Now that our build and Firebase spec is configured, we can deploy with firebase deploy.
~/dev/hgym (master*) $ firebase Deploy

=== Deploying to 'hunter-gym'...

i  deploying hosting
i  hosting[hunter-gym]: beginning deploy...
i  hosting[hunter-gym]: found 28 files in build/web
✔  hosting[hunter-gym]: file upload complete
i  hosting[hunter-gym]: finalizing version...
✔  hosting[hunter-gym]: version finalized
i  hosting[hunter-gym]: releasing new version...
✔  hosting[hunter-gym]: release complete

✔  Deploy complete!
And there it is! I set up a custom domain for it, so you can find it at gym.hfernandes.com.
First, it’s amazing that I can build a web app with the same codebase as my Android app. That blows my mind. For the most part it looks and feels the same. The whole page is basically a <canvas /> element, so it’s clear Google is shipping the whole Flutter runtime to the browser instead of rendering to DOM.

In web, an icon that should be hidden is visible and overlapping.
However, there are a few little things that are different. For example, the icon layout for rows is slightly overlapped. I am unsure if this is a bug in the Flutter web renderer or if it’s a bug in my code and I laid out the icons wrong. That being said, there is a difference in rendering between platforms so I guess it’s a Flutter problem?
In the future (as my use cases arise) I will have to make this app more responsive to larger screen sizes. That’s going to be interesting.
CI
I am a DevOps engineer by trade, so I cannot help myself but to set up a CI pipeline even for my little app. Since I’m hosting on Github, I’ll just go with Github Actions.
Let’s create a .github/workflows/flutter.yaml file:
name: Build Android

on:
  push:
    branches: ["master"]
  pull_request:
    branches: ["master"]

jobs:
  build:
    runs-on: ubuntu-latest
    steps:
      - uses: actions/checkout@v3
      - uses: actions/setup-java@v2
        with:
          distribution: "zulu"
          java-version: "11"
      - uses: dart-lang/setup-dart@v1
        with:
          sdk: "3.1"
      - run: "dart --version"
      - uses: subosito/flutter-action@v2
        with:
          flutter-version: "3.x"
          channel: "stable"
      - run: flutter pub get
      - run: dart format -o none --set-exit-if-changed lib
      - run: flutter test
      - run: flutter build apk
      - run: flutter build appbundle
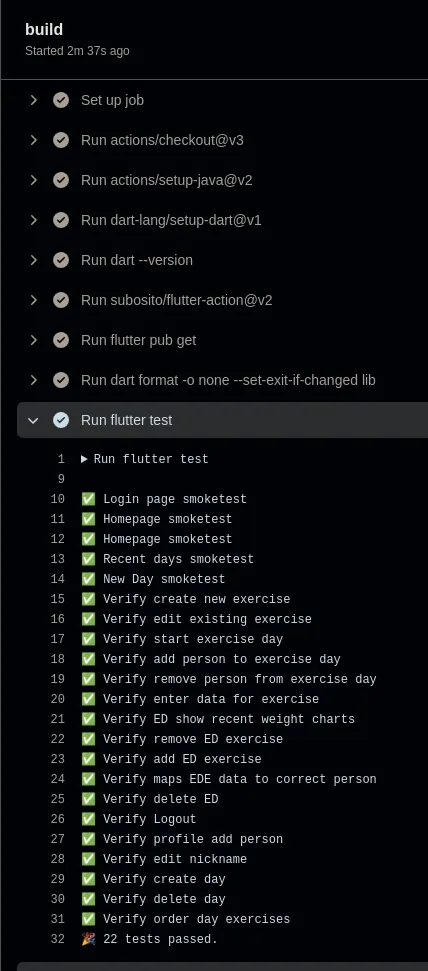
The Github Actions CI pipeline for the app.
This will run every time I push to the master branch or open a pull request. First it will run the tests, then it will build the APK and the App Bundle.
We can then quickly see if the build is passing. Flutter shows a bunch of nice green checkmarks for each passing test. Passing tests makes me happy.
Conclusion
I am really happy with how this project turned out. I learned a lot about Flutter, Firebase, and app development in general. I used to think of mobile development as a black box, but now I see that it’s just a bunch of widgets (widgets all the way down!) and some networking code.
Well, that’s a simplification. App development requires an aesthetic sense that I don’t have. My life is mostly on the backend, where beauty is a more abstract notion about code quality, performance, and architecture. In app land, beauty is a real thing that you can see and touch. It’s “how the app feels.” In a way, app development is where the rubber meets the road: functionality crossed with usability and aesthetics.
What I’ve learned is that I am definitely capable of building an app — I might do another one in the future. I’ve also learned that many of my skills and talents are transferable to the frontend. The “engineering mindset” spans all disciplines!
Footnotes
I call this a siren call because all of the expert mobile developers I know have told me to go native. They say that the performance is better, the tooling is better, and the user experience is better. And that may be true. But I am one person, and I want to target multiple platforms. It isn’t possible with native development unless you have a team of developers. ↩
This stack would be essentially free for me to run. PlanetScale has a generous free tier (and a great product). AWS API Gateway/Lambda would bill per request and round to approximately $0.00. Plus, I have a lot of experience with this stack. ↩
I love relational databases. But oh-my-god, they give you enough rope to hang yourself. Relational databases will make whatever crazy query pattern you want work… but only at a small scale. As soon as your data grows, you’ll be in a world of hurt. You can have outages when your data finally spills out of memory and onto disk. NoSQL databases force you to think about your data model upfront, but the query cost stays about the same no matter how big your data gets. ↩